

Nurture the Soil is the third principle and a cornerstone of Bay Friendly practices… based on the theory that feeding the soil, not the plant, encourages a thriving food-web of microorganism, worms and other beneficial creatures. Healthy, living soil teems with all kinds of bacteria, worms and other organisms that carry out these crucial actions:
Build soil structure;
Store and cycle nutrients;
Protect plants from pests;
Improve water infiltration and storage;
Filter out urban pollutants.
Before and during any construction or garden renovations, always follow these procedures:
1 - Protect the topsoil, typically the first few inches of soil, which nurtures a plants ‘feeder roots.’ Topsoil is a valuable resource that often is removed or mixed with subsoil during construction; conserving it can reduce many problems over the long run and minimize fertilizer and irrigation requirements.
2 - Protect soil from compaction: heavy equipment can compact soil down to 2 feet below the surface. Compacted soils don’t have adequate space for air or water; avoid walking on and working in soil that is too wet or too dry.
3 – Defend against erosion: during construction, prevent loss of soil by storm-water runoff or wind … stock-pile and cover topsoil for reuse. On steep slopes, create terraces; and don’t remove valuable trees or shrubs, which help to prevent erosion, and protect them with fencing.
4 – Amend soil with compost before planting: Compost improves problem soils, especially those that are compacted, heavy clay or sandy, or lead contaminated. For trees and shrubs, amend the entire planting bed or dig planting holes no deeper than the root ball and a minimum of 3 times the size of the new plant’s root ball. Rough up the sides of the hole and mix soil compost into soil, then backfill. If possible use compost made from local green and food waste.
5 – Grasscycle: if you still have lawn, leave the clippings on the lawn after mowing, except when grass is too wet or too long. Clippings can meet some of the lawn’s nitrogen needs and supply other nutrients as well.
6 – Mulch regularly: organic materials - bark chips, composted green waste, leaves, etc – supply nutrients. Maintain 2-4 inches of organic mulch over the soil surface at all times; this helps to conserve water, suppress weed growth, provide nutrients that enhance growth and make the garden look clean and fresh!
• See article below ‘ Sheet Mulching.
7 – Aerate compacted soils: one easy way is to use power augers or water jets to create holes in compacted soil around trees and shrubs and fill with compost. For turf/sod, top-dressing with compost after aerating in spring is best.
8 – Naturally feed soil: Apply compost each spring and fall either with compost tea (see links following) or by top-dressing; this means spreading compost around the base of the plant and letting it work its way into the planting bed, then replace the mulch. For information on compost tea, check www.composttea.org or www.soilfoodweb.com.
9 – Avoid synthetic, quick release fertilizers: a plant’s nutrient requirements are best met with compost, naturally derived fertilizers or slow-release fertilizer – only if your plant really needs nourishing.
10 – Avoid or at least Minimize Chemical Pesticides: some can be toxic to soil dwelling creatures such as earthworms. Minimizing pesticides reduces water pollution and helps support soil life.
Next time, we’ll focus on conserving water, a huge issue throughout California.
21 September 2010


05 August 2010
Bay Friendly Practices
Bay Friendly landscape guidelines were written for landscape professionals to provide an integrated, common-sense approach to sustainable practices. If you’re a handy DIY person who enjoys working in your garden, these guidelines will help you get started. They’re organized around 7 principles, the first of which I outlined below – landscape locally.
The second principle of Bay Friendly sustainable landscaping practices is: Landscape for Less in the Landfill. This means reducing waste or more correctly, not producing waste in the first place.
Start with the plants: select the right plant for the right place, irrigate properly without overwatering, fertilize appropriately, and you will significantly reduce your green waste.
To help guide your research, two excellent plant references are:
Plants and Landscapes for Summer-Dry Climates published by East Bay Municipal Utility District-EBMUD; and Sunset’s Western Garden Book
• Choose plants that thrive in your microclimate and soil conditions; see Sunset’s West Coast Climate Zones used in both above noted references
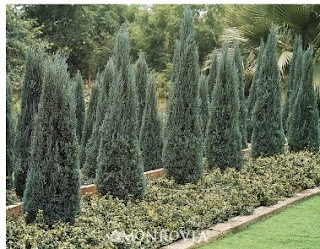
• Space plants so they grow to the natural size without regular pruning and trimming; these silvery Junipers will keep their narrow upright girth and create a dynamic screen or wind-break as well
• Replace hedges that need shearing with informal shrubs that don’t; this Ligustrum (privet) hedge below could look more natural and attractive if left un-sheared; rosemary shrubs (bottom) also make a lovely fragrant hedge
+hedge.jpg)

• Avoid invasive plants; these are listed at www.cal-ipc.org
• Grass-cycle: this means leaving lawn clippings on the ground after mowing to decompose and release nutrients
• Use plant debris for mulch: clipped, chipped, then spread over the soil
• Compost plant debris: allow your green waste to decompose and use it as soil amendment
• Prune selectively only to enhance the plant’s natural shape; you can avoid most pruning by giving plants the space they need to grow to their optimum size
• Water appropriately with drip irrigation… more on this later; over-watering can kill more plants than drought!
• Rent goats to control weeds and create firebreaks, especially on larger spaces
• Reuse, re-purpose, recycle; see previous article on this blog for list of local salvage yards
• Reduce and recycle waste; an example is to use excavated soil to create raised planting berms or mounds instead of sending it to the dump; return plant pots to the nursery, donate them to your local city college horticulture program, or in San Francisco, recycle them
• Separate plant debris for clean green – read why this is necessary in article on green waste
The San Francisco Bay Area has more than 30 microclimates. Selecting plants that are compatible with the exposure, temperature, moisture and soil in your garden and your microclimate produces healthier, more robust plants. Not only will you lower your maintenance, you also will minimize the waste that over-burdens landfill.
Next installment… Nuture the Soil!
The second principle of Bay Friendly sustainable landscaping practices is: Landscape for Less in the Landfill. This means reducing waste or more correctly, not producing waste in the first place.
Start with the plants: select the right plant for the right place, irrigate properly without overwatering, fertilize appropriately, and you will significantly reduce your green waste.
To help guide your research, two excellent plant references are:
Plants and Landscapes for Summer-Dry Climates published by East Bay Municipal Utility District-EBMUD; and Sunset’s Western Garden Book
• Choose plants that thrive in your microclimate and soil conditions; see Sunset’s West Coast Climate Zones used in both above noted references
• Space plants so they grow to the natural size without regular pruning and trimming; these silvery Junipers will keep their narrow upright girth and create a dynamic screen or wind-break as well

• Replace hedges that need shearing with informal shrubs that don’t; this Ligustrum (privet) hedge below could look more natural and attractive if left un-sheared; rosemary shrubs (bottom) also make a lovely fragrant hedge
+hedge.jpg)

• Avoid invasive plants; these are listed at www.cal-ipc.org
• Grass-cycle: this means leaving lawn clippings on the ground after mowing to decompose and release nutrients
• Use plant debris for mulch: clipped, chipped, then spread over the soil
• Compost plant debris: allow your green waste to decompose and use it as soil amendment
• Prune selectively only to enhance the plant’s natural shape; you can avoid most pruning by giving plants the space they need to grow to their optimum size
• Water appropriately with drip irrigation… more on this later; over-watering can kill more plants than drought!
• Rent goats to control weeds and create firebreaks, especially on larger spaces
• Reuse, re-purpose, recycle; see previous article on this blog for list of local salvage yards
• Reduce and recycle waste; an example is to use excavated soil to create raised planting berms or mounds instead of sending it to the dump; return plant pots to the nursery, donate them to your local city college horticulture program, or in San Francisco, recycle them
• Separate plant debris for clean green – read why this is necessary in article on green waste
The San Francisco Bay Area has more than 30 microclimates. Selecting plants that are compatible with the exposure, temperature, moisture and soil in your garden and your microclimate produces healthier, more robust plants. Not only will you lower your maintenance, you also will minimize the waste that over-burdens landfill.
Next installment… Nuture the Soil!
10 July 2010
Bay Friendly Practices
Bay Friendly landscape guidelines were written for landscape professionals to provide an integrated, common-sense approach to sustainability. If you’re a handy DIY person, these guidelines will help you get started. They’re organized around 7 principles, the first of which I’ll briefly outline here.
Watch this space for future installments and the second principle: Landscape for Less to the Landfill.
First principle – landscape locally: Respect the natural attributes of the region in which you are landscaping. This doesn’t mean we have to return to the wild, uncontrolled landscape that once prevailed; instead we can contribute to the health, diversity and sustainability of the existing ecosystem.
How can we apply this? When planning your landscape, first, analyze the site carefully and on the site map, identify these areas:
• Sunny, shady and part shady areas
• Hot spots along south facing walls and fences
• Wet or dry spots
• Windy or exposed areas and direction of prevailing winds
• Slopes
• Frost pockets
• Shape and size of planting areas
• Zones with difficult access
• Water flow
This information determines everything you need to apply all other principles, especially when selecting plants that are drought tolerant, low water and climate appropriate.


Left: one of many Ceanothus varieties-the California wild lilac; right is Lupinus (lupine) hybrid.
2. Assess the soil and drainage:
Is the soil sandy, loamy or heavy clay. This determines which and how much amendment to add, the correct plants to select to thrive in that soil, and whether we need to address drainage or compaction problems. In some instances a soil analysis may be necessary, depending on the extent of problem and the planned construction.
3. Survey and protect flora and fauna:
• Identify and protect existing plants, especially California natives, endangered species and wetlands
• Learn what wildlife inhabits the site and plant to shelter and sustain them and to restore the site
• Know your local tree ordinances and endangered species; many local or regional ordinances prevent the removal of certain trees such as native oaks
• Plan to preserve existing trees; engage a certified arborist to create your plan
• Avoid invasive species, see below
4. Consider the fire potential of plants and plant debris:
In fire-prone areas, most fire departments have guidelines to help you plan for this. Remember also to construct your deck with fire-retardant material such as ipe, redwood or cedar.
5. Use local, natural plant communities:
Examples in California include Redwood Forests, hot inland Valley Grasslands and Coastal Prairies. Large areas of Oakland and Berkeley hills once were Coastal Prairie that due to urbanization, are now converted to woodland. Using these plant communities to guide your plant selection gives your landscape a sense of place and context; plus your plants are more likely to thrive with minimum water and maintenance.
Consider also where your materials, furnishings and accessories come from: Are the boulders, flagstone or slate you select quarried locally or shipped from China or Africa? Is your furniture made locally with local materials? Your choice may significantly impact your carbon footprint.
Next time… Landscape for Less in the Landscape!
Watch this space for future installments and the second principle: Landscape for Less to the Landfill.
First principle – landscape locally: Respect the natural attributes of the region in which you are landscaping. This doesn’t mean we have to return to the wild, uncontrolled landscape that once prevailed; instead we can contribute to the health, diversity and sustainability of the existing ecosystem.
How can we apply this? When planning your landscape, first, analyze the site carefully and on the site map, identify these areas:
• Sunny, shady and part shady areas
• Hot spots along south facing walls and fences
• Wet or dry spots
• Windy or exposed areas and direction of prevailing winds
• Slopes
• Frost pockets
• Shape and size of planting areas
• Zones with difficult access
• Water flow
This information determines everything you need to apply all other principles, especially when selecting plants that are drought tolerant, low water and climate appropriate.

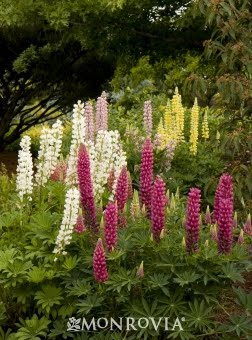
Left: one of many Ceanothus varieties-the California wild lilac; right is Lupinus (lupine) hybrid.
2. Assess the soil and drainage:
Is the soil sandy, loamy or heavy clay. This determines which and how much amendment to add, the correct plants to select to thrive in that soil, and whether we need to address drainage or compaction problems. In some instances a soil analysis may be necessary, depending on the extent of problem and the planned construction.
3. Survey and protect flora and fauna:
• Identify and protect existing plants, especially California natives, endangered species and wetlands
• Learn what wildlife inhabits the site and plant to shelter and sustain them and to restore the site
• Know your local tree ordinances and endangered species; many local or regional ordinances prevent the removal of certain trees such as native oaks
• Plan to preserve existing trees; engage a certified arborist to create your plan
• Avoid invasive species, see below
4. Consider the fire potential of plants and plant debris:
In fire-prone areas, most fire departments have guidelines to help you plan for this. Remember also to construct your deck with fire-retardant material such as ipe, redwood or cedar.
5. Use local, natural plant communities:
Examples in California include Redwood Forests, hot inland Valley Grasslands and Coastal Prairies. Large areas of Oakland and Berkeley hills once were Coastal Prairie that due to urbanization, are now converted to woodland. Using these plant communities to guide your plant selection gives your landscape a sense of place and context; plus your plants are more likely to thrive with minimum water and maintenance.
Consider also where your materials, furnishings and accessories come from: Are the boulders, flagstone or slate you select quarried locally or shipped from China or Africa? Is your furniture made locally with local materials? Your choice may significantly impact your carbon footprint.
Next time… Landscape for Less in the Landscape!
29 June 2010
Voted 1 of Top 5 Landscape Designers
We are thrilled to have finished in the Top 5 - Best Landscape Designers in the San Francisco Bay Area. Thank you to all who voted for us! We appreciate your lovely comments.
15 May 2010
Car Idling
Should I Shut Off the Motor When I'm Idling my Car?
Here's the rule of thumb: If you're in a drive-through restaurant/business line or waiting for someone and you'll be parked and sitting for 10 seconds or longer... turn off your car's engine.
Why? For every two minutes a car is idling, it uses about the same amount of fuel it takes to go about one mile. Research indicates that the average person idles their car five to 10 minutes a day. People usually idle their cars more in the winter than in the summer. But even in winter, you don't need to let your car sit and idle for five minutes to "warm it up" when 30 seconds will do just fine.
But you're not going anywhere. Idling gets ZERO miles per gallon.
The recommendation is: If you are going to be parked for more than 30 seconds, turn off the engine. Ten seconds of idling can use more fuel than turning off the engine and restarting it. And when you start your engine, don't step down on the accelerator, just simply turn the key to start.
An alternative to idling is to park your car, walk inside, do your business and then go back to your car.
Here are some other Myths associated with idling.
Myth #1: The engine should be warmed up before driving. Reality: Idling is not an effective way to warm up your vehicle, even in cold weather. The best way to do this is to drive the vehicle. With today's modern engines, you need no more than 30 seconds of idling on winter days before driving away.
Myth #2: Idling is good for your engine. Reality: Excessive idling can actually damage your engine components, including cylinders, spark plugs, and exhaust systems. Fuel is only partially combusted when idling because an engine does not operate at its peak temperature. This leads to the build up of fuel residues on cylinder walls that can damage engine components and increase fuel consumption.
Myth #3: Shutting off and restarting your vehicle is hard on the engine and uses more gas than if you leave it running. Reality: Frequent restarting has little impact on engine components like the battery and the starter motor. Component wear caused by restarting the engine is estimated to add $10 per year to the cost of driving, money that will likely be recovered several times over in fuel savings from reduced idling. The bottom line is that more than ten seconds of idling uses more fuel than restarting the engine.
Courtesy of: http://www.consumerenergycenter.org/myths/idling.html
Here's the rule of thumb: If you're in a drive-through restaurant/business line or waiting for someone and you'll be parked and sitting for 10 seconds or longer... turn off your car's engine.
Why? For every two minutes a car is idling, it uses about the same amount of fuel it takes to go about one mile. Research indicates that the average person idles their car five to 10 minutes a day. People usually idle their cars more in the winter than in the summer. But even in winter, you don't need to let your car sit and idle for five minutes to "warm it up" when 30 seconds will do just fine.
But you're not going anywhere. Idling gets ZERO miles per gallon.
The recommendation is: If you are going to be parked for more than 30 seconds, turn off the engine. Ten seconds of idling can use more fuel than turning off the engine and restarting it. And when you start your engine, don't step down on the accelerator, just simply turn the key to start.
An alternative to idling is to park your car, walk inside, do your business and then go back to your car.
Here are some other Myths associated with idling.
Myth #1: The engine should be warmed up before driving. Reality: Idling is not an effective way to warm up your vehicle, even in cold weather. The best way to do this is to drive the vehicle. With today's modern engines, you need no more than 30 seconds of idling on winter days before driving away.
Myth #2: Idling is good for your engine. Reality: Excessive idling can actually damage your engine components, including cylinders, spark plugs, and exhaust systems. Fuel is only partially combusted when idling because an engine does not operate at its peak temperature. This leads to the build up of fuel residues on cylinder walls that can damage engine components and increase fuel consumption.
Myth #3: Shutting off and restarting your vehicle is hard on the engine and uses more gas than if you leave it running. Reality: Frequent restarting has little impact on engine components like the battery and the starter motor. Component wear caused by restarting the engine is estimated to add $10 per year to the cost of driving, money that will likely be recovered several times over in fuel savings from reduced idling. The bottom line is that more than ten seconds of idling uses more fuel than restarting the engine.
Courtesy of: http://www.consumerenergycenter.org/myths/idling.html
08 May 2010
Tour With Us

Friends of Noe Valley sponsor the tour and proceeds benefit a neighborhood greening project. For details call May at 415.298.2344. See photo at the ShortTakes column of the May issue of Noe Valley Voice.
02 May 2010
Water Water ... Everywhere?
Recent rain storms might have you thinking we’re now over the three-year drought. Snow-pack is above normal for this time of year, reservoirs are filling up. But like the skeptics who believe the east coast snow storms disprove the ‘inconvenient truth’ of climate change, our water shortages are not replenished with just one wet winter. Without immediate action, California residents by 2015 will be consuming more water at current usage rates than will be available, regardless of future rains.
Effective January 2010, new state water regulations seriously impact the allowable use of water for landscaping (see link below: CA State AB 1881 - WELO - Water Efficient Landscape Ordinance). While these regulations may not directly affect many small urban gardens, they do provide a useful guide for people trying to plan for future conservation, because by 2020, California will require all residents to reduce overall water use by 20 percent. And in case this is not obvious, this legislation is telling us we face tighter supplies, and consequently, significantly higher water costs. It makes sense to start with this reality.
So what can we do now to prepare. One simple way to reduce water consumption is to harvest rainwater. Rainwater is harvested by redirecting down-spouts and gutters into water-tight barrels to which your irrigation system can be attached to run exactly as it would from your tap. In addition to watering your garden, rainwater also can be used for bathing, flushing toilets and washing laundry. Salvaging rainwater protects the environment as well as minimizing waste and costly treatment systems: Runoff water is a major source of pollution in San Francisco Bay, as it makes its way over toxic rooftop materials and oily streets into storm drainage systems.
 Numerous resources are available on-line to demonstrate rain-barrel installations for the do-it-yourselfer (see links below). For the not-so-handy, rain barrels can be discretely designed into your new landscape (hidden under decks, screened with plants or trellis); or they can be added later as part of on-going maintenance. And if your budget prevents purchasing high-end designer tanks, other options are available for the resourceful homeowner. Some garden centers and hardware stores also sell barrels. Be aware: all rainwater storage units need to have a first flush diverter (literally, to clear debris from the initial water flow); a strainer to prevent dirt getting into your container; an overflow devise when the barrels fill up. And for functionality, containers are best elevated on concrete blocks or similar. It is critical they be water-tight and screened to dispel mosquitoes.
If properly harvested and stored, rainwater also is drinkable, but only if the containers are food grade (think earthquake preparedness!) As long as your roofing material is non-toxic, rainwater flowing off it is drinkable.
An alternative or adjunct to harvesting rainwater is to reclaim household ‘grey-water’ from the clothes washer, shower and/or dishwasher. This is more complex and may require the services of a plumber and in some areas, a permit. If these options are not viable for your space or the footprint of your home, another way to minimize waste while promoting healthier soil is to create a ‘rain garden.’ Essentially a retention basin, this shallow depression initially contains rainwater that is directed from gutters and down-spouts. As it percolates into the soil, the water is filtered of impurities, thus preventing polluted runoff from entering the municipal water system and the Bay. Properly designed, these areas can be incorporated into your new or existing garden and planted with appropriate trees, shrubs and perennials. Where space allows, they can be designed to look like wet/dry streams, swales or water-features.

http://www.greywaterguerrillas.com/;
http://www.water.ca.gov/wateruseefficiency/landscapeordinance/]
Effective January 2010, new state water regulations seriously impact the allowable use of water for landscaping (see link below: CA State AB 1881 - WELO - Water Efficient Landscape Ordinance). While these regulations may not directly affect many small urban gardens, they do provide a useful guide for people trying to plan for future conservation, because by 2020, California will require all residents to reduce overall water use by 20 percent. And in case this is not obvious, this legislation is telling us we face tighter supplies, and consequently, significantly higher water costs. It makes sense to start with this reality.
So what can we do now to prepare. One simple way to reduce water consumption is to harvest rainwater. Rainwater is harvested by redirecting down-spouts and gutters into water-tight barrels to which your irrigation system can be attached to run exactly as it would from your tap. In addition to watering your garden, rainwater also can be used for bathing, flushing toilets and washing laundry. Salvaging rainwater protects the environment as well as minimizing waste and costly treatment systems: Runoff water is a major source of pollution in San Francisco Bay, as it makes its way over toxic rooftop materials and oily streets into storm drainage systems.

If properly harvested and stored, rainwater also is drinkable, but only if the containers are food grade (think earthquake preparedness!) As long as your roofing material is non-toxic, rainwater flowing off it is drinkable.
An alternative or adjunct to harvesting rainwater is to reclaim household ‘grey-water’ from the clothes washer, shower and/or dishwasher. This is more complex and may require the services of a plumber and in some areas, a permit. If these options are not viable for your space or the footprint of your home, another way to minimize waste while promoting healthier soil is to create a ‘rain garden.’ Essentially a retention basin, this shallow depression initially contains rainwater that is directed from gutters and down-spouts. As it percolates into the soil, the water is filtered of impurities, thus preventing polluted runoff from entering the municipal water system and the Bay. Properly designed, these areas can be incorporated into your new or existing garden and planted with appropriate trees, shrubs and perennials. Where space allows, they can be designed to look like wet/dry streams, swales or water-features.

As with rain gardens, the issue for most San Francisco Bay Area homeowners typically is space, or lack of space to store the rain barrels. Even if you have space for just one or two containers, these can be replenished in the dry season with water salvaged from the shower as it runs ‘till it’s hot. Possibly the simplest water-conserving method is to plant drought-tolerant natives, succulents and climate-appropriate plants that require minimal or no water once they become established. A responsible plant selection can produce a lush, luxuriant garden, as green as the once-favored lawn without the consequent hazards of pesticide use, oil-powered mowers and wasted water.
http://www.water.ca.gov/wateruseefficiency/landscapeordinance/]
Subscribe to:
Posts (Atom)
