

- Cover trees and plants with burlap or similar fabric or plastic
- Bring tender potted plants indoors;
- Insulate the plant roots with lots of mulch;
25 February 2011
Weather Alert... February 25 - 28
A freeze warning has been issued for the San Francisco Bay Area, starting tonight through the weekend. If you have any new young tender plants, here’s how you can protect them; these include succulents, citrus, bougainvillea, and most tropical-style plants
11 October 2010
Tips for the Lazy (and Smart) Gardener
If you're about to prep your garden for fall, either to plant your veggies or to retard weed growth, this New York Times article shows you how. Here's a brief excerpt:
First, pluck the weeds; next, lay 4 sheets of newspaper and wet the paper; top off with compost or mulch. If you're installing plants, compost is best; to suppress weeds, lay mulch at least 2" deep.
If you’re starting a new garden the no-till way - which basically means using newspapers to smother the grass and weeds without resorting to herbicides - just add a few inches of compost and plant right through it.
The advantages of not tilling are many. Weed seeds are not brought to the surface of the soil, where they readily sprout and grow. You don’t churn up earthworms and countless other organisms that will aerate and enrich the soil just fine if you feed them compost and leave them alone. And since gas-powered tillers not only pour hydrocarbons into the air, they also release CO2 when they churn up the soil, leaving them in the garage is a good way to minimize your carbon footprint.
When weeds do grow — as they inevitably will, blowing in on the wind, or sprouting from less-than-perfect compost — the article suggests spritzing them, while they are still sprouts, with a homemade solution: a gallon of vinegar mixed with 2 tablespoons canola oil (other oils will gum up) and 1 tablespoon liquid Ivory dish detergent. Spray on a regular basis: 'You have to starve out the roots, so don’t wait and let the weeds get big.' Read article here:
01 October 2010
WATER in the garden
Gardens in the old days typically contained a water source from which gardeners could draw water to irrigate plants. Farmers also captured rainwater for this and other domestic uses. In classic Japanese gardens water often is simulated with raking techniques in patterns that suggest waves and rippling water. Other features also evoke water… dry streams of smooth river rock or tumbled glass create the impression of imminent cascading water.
Ponds or pools that reflect the sky and surrounding landscape visually expand a garden far beyond its physical boundaries. The tiniest stone basin or dish adds great mystery and dimension while also attracting birds to feed and bathe. Even the smallest gardens benefit from a water source.
Many inexpensive features are available today readymade and as long as the water is flowing, moved by low-voltage pumps, mosquitoes will not breed. When considering a water element, select a feature that will compliment the style, character and scale of your landscape … here are some examples:
 |
| pavers appear to float across the pond |
 |
| babbling brook rambles through English-style country garden |
 |
| beautiful Italian ceramic pot recycles gurgling water |
 |
| cranes quench their thirst in Asian-style garden |
 |
| framed by robust arbor, wall fountain screens imposing wall |
 |
| Quan Yin soothes the senses |
 |
| existing hillside provides perfect backdrop |
 |
| industrial size & strength metal compliments contemporary style |
 |
| water bowl nestles in Zen space |
 |
| rippling water from polished granite fountain is replicated in surrounding plants |
23 September 2010
Speedy New Service
Speedy Garden Make-Over... some samples included at:
http://www.liquidambar.biz/portfolio2.php;
This is suitable for small, simple spaces such as typical urban front or back gardens measuring approx. 25 x 30 feet or similar that don’t require complex or multi-level retaining elements or other major structures. Appropriate also for curb appeal upgrades, intimate spaces within large gardens, replacing thirsty lawns with drought-tolerant plants, installing water feature to buffer street noises and more. Here’s how it works:
Your complete a questionnaire, describing your needs and how you wish to use the space
Based on your needs we develop your design concept on site or in our studio during 1 or 2 design consultations;
Includes layout plan drawn to scale indicating location of built elements such as patios, walls, decks, arbors, etc;
Locates primary plants and planting beds along with list of plants and materials;
Provides referrals to reputable landscape contractors, gardeners and suppliers
Once completed, you can then decide whether to coordinate the installation yourself or engage us to implement it for you. (The size & location of the garden determines exact hours & cost)
Of course we still provide our
Fully Developed, Documented Design Concepts … suitable for large, challenging or complex Bay Area sites that often require retaining walls, terracing, multi-level patios or decks, custom water features and more. Consequently, design development may involve more thorough site investigation and design consideration, take longer and cost more.
To discuss your garden contact katey@liquidambar.biz;
For more information, see www.liquidambar.biz/services.php;
and www.liquidambar.biz/resources.php;
Visit us on facebook..
http://www.facebook.com/pages/San-Francisco-CA/LIQUIDAMBAR-Garden-Design/104796105886
21 September 2010
Bay Friendly Practices
Nurture the Soil is the third principle and a cornerstone of Bay Friendly practices… based on the theory that feeding the soil, not the plant, encourages a thriving food-web of microorganism, worms and other beneficial creatures. Healthy, living soil teems with all kinds of bacteria, worms and other organisms that carry out these crucial actions:
Build soil structure;
Store and cycle nutrients;
Protect plants from pests;
Improve water infiltration and storage;
Filter out urban pollutants.
Before and during any construction or garden renovations, always follow these procedures:
1 - Protect the topsoil, typically the first few inches of soil, which nurtures a plants ‘feeder roots.’ Topsoil is a valuable resource that often is removed or mixed with subsoil during construction; conserving it can reduce many problems over the long run and minimize fertilizer and irrigation requirements.
2 - Protect soil from compaction: heavy equipment can compact soil down to 2 feet below the surface. Compacted soils don’t have adequate space for air or water; avoid walking on and working in soil that is too wet or too dry.
3 – Defend against erosion: during construction, prevent loss of soil by storm-water runoff or wind … stock-pile and cover topsoil for reuse. On steep slopes, create terraces; and don’t remove valuable trees or shrubs, which help to prevent erosion, and protect them with fencing.
4 – Amend soil with compost before planting: Compost improves problem soils, especially those that are compacted, heavy clay or sandy, or lead contaminated. For trees and shrubs, amend the entire planting bed or dig planting holes no deeper than the root ball and a minimum of 3 times the size of the new plant’s root ball. Rough up the sides of the hole and mix soil compost into soil, then backfill. If possible use compost made from local green and food waste.
5 – Grasscycle: if you still have lawn, leave the clippings on the lawn after mowing, except when grass is too wet or too long. Clippings can meet some of the lawn’s nitrogen needs and supply other nutrients as well.
6 – Mulch regularly: organic materials - bark chips, composted green waste, leaves, etc – supply nutrients. Maintain 2-4 inches of organic mulch over the soil surface at all times; this helps to conserve water, suppress weed growth, provide nutrients that enhance growth and make the garden look clean and fresh!
• See article below ‘ Sheet Mulching.
7 – Aerate compacted soils: one easy way is to use power augers or water jets to create holes in compacted soil around trees and shrubs and fill with compost. For turf/sod, top-dressing with compost after aerating in spring is best.
8 – Naturally feed soil: Apply compost each spring and fall either with compost tea (see links following) or by top-dressing; this means spreading compost around the base of the plant and letting it work its way into the planting bed, then replace the mulch. For information on compost tea, check www.composttea.org or www.soilfoodweb.com.
9 – Avoid synthetic, quick release fertilizers: a plant’s nutrient requirements are best met with compost, naturally derived fertilizers or slow-release fertilizer – only if your plant really needs nourishing.
10 – Avoid or at least Minimize Chemical Pesticides: some can be toxic to soil dwelling creatures such as earthworms. Minimizing pesticides reduces water pollution and helps support soil life.
Next time, we’ll focus on conserving water, a huge issue throughout California.
05 August 2010
Bay Friendly Practices
Bay Friendly landscape guidelines were written for landscape professionals to provide an integrated, common-sense approach to sustainable practices. If you’re a handy DIY person who enjoys working in your garden, these guidelines will help you get started. They’re organized around 7 principles, the first of which I outlined below – landscape locally.
The second principle of Bay Friendly sustainable landscaping practices is: Landscape for Less in the Landfill. This means reducing waste or more correctly, not producing waste in the first place.
Start with the plants: select the right plant for the right place, irrigate properly without overwatering, fertilize appropriately, and you will significantly reduce your green waste.
To help guide your research, two excellent plant references are:
Plants and Landscapes for Summer-Dry Climates published by East Bay Municipal Utility District-EBMUD; and Sunset’s Western Garden Book
• Choose plants that thrive in your microclimate and soil conditions; see Sunset’s West Coast Climate Zones used in both above noted references
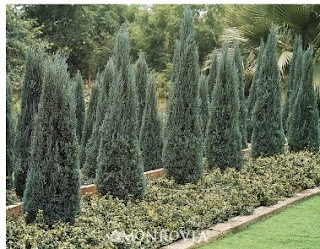
• Space plants so they grow to the natural size without regular pruning and trimming; these silvery Junipers will keep their narrow upright girth and create a dynamic screen or wind-break as well
• Replace hedges that need shearing with informal shrubs that don’t; this Ligustrum (privet) hedge below could look more natural and attractive if left un-sheared; rosemary shrubs (bottom) also make a lovely fragrant hedge
+hedge.jpg)

• Avoid invasive plants; these are listed at www.cal-ipc.org
• Grass-cycle: this means leaving lawn clippings on the ground after mowing to decompose and release nutrients
• Use plant debris for mulch: clipped, chipped, then spread over the soil
• Compost plant debris: allow your green waste to decompose and use it as soil amendment
• Prune selectively only to enhance the plant’s natural shape; you can avoid most pruning by giving plants the space they need to grow to their optimum size
• Water appropriately with drip irrigation… more on this later; over-watering can kill more plants than drought!
• Rent goats to control weeds and create firebreaks, especially on larger spaces
• Reuse, re-purpose, recycle; see previous article on this blog for list of local salvage yards
• Reduce and recycle waste; an example is to use excavated soil to create raised planting berms or mounds instead of sending it to the dump; return plant pots to the nursery, donate them to your local city college horticulture program, or in San Francisco, recycle them
• Separate plant debris for clean green – read why this is necessary in article on green waste
The San Francisco Bay Area has more than 30 microclimates. Selecting plants that are compatible with the exposure, temperature, moisture and soil in your garden and your microclimate produces healthier, more robust plants. Not only will you lower your maintenance, you also will minimize the waste that over-burdens landfill.
Next installment… Nuture the Soil!
The second principle of Bay Friendly sustainable landscaping practices is: Landscape for Less in the Landfill. This means reducing waste or more correctly, not producing waste in the first place.
Start with the plants: select the right plant for the right place, irrigate properly without overwatering, fertilize appropriately, and you will significantly reduce your green waste.
To help guide your research, two excellent plant references are:
Plants and Landscapes for Summer-Dry Climates published by East Bay Municipal Utility District-EBMUD; and Sunset’s Western Garden Book
• Choose plants that thrive in your microclimate and soil conditions; see Sunset’s West Coast Climate Zones used in both above noted references
• Space plants so they grow to the natural size without regular pruning and trimming; these silvery Junipers will keep their narrow upright girth and create a dynamic screen or wind-break as well

• Replace hedges that need shearing with informal shrubs that don’t; this Ligustrum (privet) hedge below could look more natural and attractive if left un-sheared; rosemary shrubs (bottom) also make a lovely fragrant hedge
+hedge.jpg)

• Avoid invasive plants; these are listed at www.cal-ipc.org
• Grass-cycle: this means leaving lawn clippings on the ground after mowing to decompose and release nutrients
• Use plant debris for mulch: clipped, chipped, then spread over the soil
• Compost plant debris: allow your green waste to decompose and use it as soil amendment
• Prune selectively only to enhance the plant’s natural shape; you can avoid most pruning by giving plants the space they need to grow to their optimum size
• Water appropriately with drip irrigation… more on this later; over-watering can kill more plants than drought!
• Rent goats to control weeds and create firebreaks, especially on larger spaces
• Reuse, re-purpose, recycle; see previous article on this blog for list of local salvage yards
• Reduce and recycle waste; an example is to use excavated soil to create raised planting berms or mounds instead of sending it to the dump; return plant pots to the nursery, donate them to your local city college horticulture program, or in San Francisco, recycle them
• Separate plant debris for clean green – read why this is necessary in article on green waste
The San Francisco Bay Area has more than 30 microclimates. Selecting plants that are compatible with the exposure, temperature, moisture and soil in your garden and your microclimate produces healthier, more robust plants. Not only will you lower your maintenance, you also will minimize the waste that over-burdens landfill.
Next installment… Nuture the Soil!
10 July 2010
Bay Friendly Practices
Bay Friendly landscape guidelines were written for landscape professionals to provide an integrated, common-sense approach to sustainability. If you’re a handy DIY person, these guidelines will help you get started. They’re organized around 7 principles, the first of which I’ll briefly outline here.
Watch this space for future installments and the second principle: Landscape for Less to the Landfill.
First principle – landscape locally: Respect the natural attributes of the region in which you are landscaping. This doesn’t mean we have to return to the wild, uncontrolled landscape that once prevailed; instead we can contribute to the health, diversity and sustainability of the existing ecosystem.
How can we apply this? When planning your landscape, first, analyze the site carefully and on the site map, identify these areas:
• Sunny, shady and part shady areas
• Hot spots along south facing walls and fences
• Wet or dry spots
• Windy or exposed areas and direction of prevailing winds
• Slopes
• Frost pockets
• Shape and size of planting areas
• Zones with difficult access
• Water flow
This information determines everything you need to apply all other principles, especially when selecting plants that are drought tolerant, low water and climate appropriate.


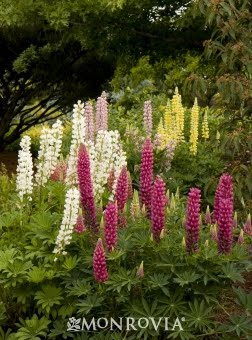
Left: one of many Ceanothus varieties-the California wild lilac; right is Lupinus (lupine) hybrid.
2. Assess the soil and drainage:
Is the soil sandy, loamy or heavy clay. This determines which and how much amendment to add, the correct plants to select to thrive in that soil, and whether we need to address drainage or compaction problems. In some instances a soil analysis may be necessary, depending on the extent of problem and the planned construction.
3. Survey and protect flora and fauna:
• Identify and protect existing plants, especially California natives, endangered species and wetlands
• Learn what wildlife inhabits the site and plant to shelter and sustain them and to restore the site
• Know your local tree ordinances and endangered species; many local or regional ordinances prevent the removal of certain trees such as native oaks
• Plan to preserve existing trees; engage a certified arborist to create your plan
• Avoid invasive species, see below
4. Consider the fire potential of plants and plant debris:
In fire-prone areas, most fire departments have guidelines to help you plan for this. Remember also to construct your deck with fire-retardant material such as ipe, redwood or cedar.
5. Use local, natural plant communities:
Examples in California include Redwood Forests, hot inland Valley Grasslands and Coastal Prairies. Large areas of Oakland and Berkeley hills once were Coastal Prairie that due to urbanization, are now converted to woodland. Using these plant communities to guide your plant selection gives your landscape a sense of place and context; plus your plants are more likely to thrive with minimum water and maintenance.
Consider also where your materials, furnishings and accessories come from: Are the boulders, flagstone or slate you select quarried locally or shipped from China or Africa? Is your furniture made locally with local materials? Your choice may significantly impact your carbon footprint.
Next time… Landscape for Less in the Landscape!
Watch this space for future installments and the second principle: Landscape for Less to the Landfill.
First principle – landscape locally: Respect the natural attributes of the region in which you are landscaping. This doesn’t mean we have to return to the wild, uncontrolled landscape that once prevailed; instead we can contribute to the health, diversity and sustainability of the existing ecosystem.
How can we apply this? When planning your landscape, first, analyze the site carefully and on the site map, identify these areas:
• Sunny, shady and part shady areas
• Hot spots along south facing walls and fences
• Wet or dry spots
• Windy or exposed areas and direction of prevailing winds
• Slopes
• Frost pockets
• Shape and size of planting areas
• Zones with difficult access
• Water flow
This information determines everything you need to apply all other principles, especially when selecting plants that are drought tolerant, low water and climate appropriate.

Left: one of many Ceanothus varieties-the California wild lilac; right is Lupinus (lupine) hybrid.
2. Assess the soil and drainage:
Is the soil sandy, loamy or heavy clay. This determines which and how much amendment to add, the correct plants to select to thrive in that soil, and whether we need to address drainage or compaction problems. In some instances a soil analysis may be necessary, depending on the extent of problem and the planned construction.
3. Survey and protect flora and fauna:
• Identify and protect existing plants, especially California natives, endangered species and wetlands
• Learn what wildlife inhabits the site and plant to shelter and sustain them and to restore the site
• Know your local tree ordinances and endangered species; many local or regional ordinances prevent the removal of certain trees such as native oaks
• Plan to preserve existing trees; engage a certified arborist to create your plan
• Avoid invasive species, see below
4. Consider the fire potential of plants and plant debris:
In fire-prone areas, most fire departments have guidelines to help you plan for this. Remember also to construct your deck with fire-retardant material such as ipe, redwood or cedar.
5. Use local, natural plant communities:
Examples in California include Redwood Forests, hot inland Valley Grasslands and Coastal Prairies. Large areas of Oakland and Berkeley hills once were Coastal Prairie that due to urbanization, are now converted to woodland. Using these plant communities to guide your plant selection gives your landscape a sense of place and context; plus your plants are more likely to thrive with minimum water and maintenance.
Consider also where your materials, furnishings and accessories come from: Are the boulders, flagstone or slate you select quarried locally or shipped from China or Africa? Is your furniture made locally with local materials? Your choice may significantly impact your carbon footprint.
Next time… Landscape for Less in the Landscape!
Subscribe to:
Posts (Atom)
